“STAY” CUE OVERVIEW
– Teach your dog to “Wait” and use the behavior consistently as part of your “say please” program (sit and wait for your food bowl), and to keep your dog safe (wait at doorways and getting out of cars).
– Teach your dog to “Stay” and use the behavior when you need to park your dog more solidly (for photo portraits, training class, obedience competition), when you need her to stay in position for a discrete period.
– Practice frequently, in short sessions. Set up the exercise so it’s easy for her to succeed. “Wait” and “stay” should indicate that your dog has an opportunity to earn something rewarding.
Recently, I was struck by the realization that while “Wait!” is one of the most valuable cues I use with my dogs, it’s a behavior we didn’t usually teach in old-fashioned choke-chain obedience classes. Oh, we taught rock-solid obedience ring “Stays.” Some trainers substituted the word “wait” for “stay” to differentiate between recalls (“wait” means you’re going to get up and come to me when I call you) and the one-minute and three-minute sit-and-down-stays (stay means you are never to move no matter what happens until I come back to release you). Generally, though, we didn’t use “Wait” to mean “pause” as many of us dog owners do today. “Wait” is a valuable cue; I’d be lost without it.
Of course, a cue takes on whatever meaning you give to it when you teach your dog a new word or hand signal. We tend to use words that are meaningful to us (they are much easier to remember!) but if you wanted, you could teach your dog that “Banana!” means sit, “Orange” means down, “Pumpkin” means stay, and “Kiwi” means wait. As long as you teach your dog what behavior you want him to associate with your words and use them consistently, your dog will learn the meaning you’ve assigned to them and the cues will work for you.
Given that most trainers are well aware of this, it might surprise you to discover the intensity with which trainers sometimes debate the meaning of the cues “wait” and “stay.” The whole debate is silly; our cues mean whatever we teach our dogs they mean. I’ll explain how I use (and train) the wait and stay cues. Regardless of the words you choose to use and how you choose to use them, I hope you’ll discover the immense value of distinguishing between the wait and stay behaviors.
Cueing “Wait” and “Stay”
I teach that “Wait!” means pause. If I’m leaving the house, I have my dogs sit and wait at the door as I leave. No door darters here! They know that as soon as the door closes they are free to run around the house doing acceptable doggie things. Mostly they go lie down, after a few barks from Lucy the Corgi and Missy the Aussie, who are both routinely a little stressed about being left behind. I teach that “Stay!” means “stay in the exact position I left you in until I return to your side and release you” – the standard obedience competition-style stay.
I use “wait” everywhere. I hardly ever use “stay.” If some, but not all, of our dogs are coming with me, I might ask two to wait while I invite the other two to move through the door. (Body blocking is useful for this maneuver.) All my dogs sit and wait for their food bowls – an excellent good manners behavior and an important part of a “say please” program. This reminds them that it’s my food – the leader controls all the good stuff – and I’m sharing it with them out of the goodness of my benevolent-leader heart.
My dogs “wait” if they’re getting in or out of the car. They “wait” if we’re walking off-leash and they’re getting too far ahead of me on the path. They “wait” if they’re asking to hop up on the sofa or the bed and I don’t want them up yet. They “wait” on the stair landing so I can safely walk down the stairs without tripping over a jumble of dogs.
I teach my dogs the “wait” behavior using both food bowls and doors. In my basic adult and puppy good manners classes, I teach “wait” using food bowls only (we just don’t have enough doors to go around), and save “stay” for my upper level classes. While the stay behavior certainly has value, most dog owners mean “pause” when they say “stay,” rather than “stay in the exact position I left you in until I return and release you.” I want them to learn the difference between the two behaviors early on, and teach their dogs the easier, more useful one first.
Food Bowl Waits
The easiest way to teach “wait” is to help your dog succeed by shaping the behavior in small steps. Any time your dog stops succeeding, you’ve made the steps too big, or tried to take too many steps too quickly. Always seek to find the place where your dog wins and move forward from that place in tiny steps. (See “Fun Dog Training Techniques Using Shaping,” March 2006.)
Note: If your dog guards her food bowl aggressively, don’t teach this exercise until you have successfully modified the resource-guarding behavior. (See “Eliminate Aggressive Dog Guarding Behaviors,” September 2001.) With your dog sitting perpendicular to you, hold a bowl of your dog’s food at your chest level and tell her to “wait.” Move the food bowl (with food it in, topped with tasty treats) about 4 to 6 inches toward the floor. If your dog stays sitting, click your clicker (or use a verbal marker such as “Yes!” or a tongue click) and feed her a treat from the bowl.
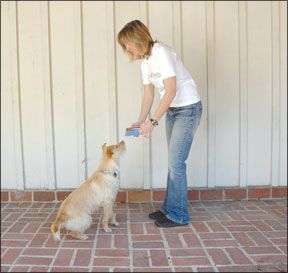
If your dog gets up, cheerfully say “Oops!” and raise the bowl back up, and ask her to sit again. Your “Oops!” is what’s known as a “no-reward marker.” It lets your dog know that getting up from the sit makes the food bowl go away.
If she remains sitting, lower the bowl 4 to 6 inches again. Click and give her a treat if she’s still sitting.
If she gets up a second time, say “Oops!” and raise the bowl, and then have her sit. On your next try, only lower the bowl an inch or two. Click and treat for each success.
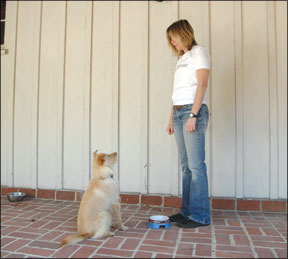
Repeat this step several times until your dog consistently remains sitting as you lower the bowl. Gradually move the bowl closer to the floor with succeeding repetitions until you can place it on the floor two feet away from your dog without her trying to get up or eat it. After each repetition, stand up straight and raise the bowl all the way back up.
Finally, place the bowl on the floor and give your dog permission to eat. After she has had a few bites, lift the bowl up and try again.
Repeat these steps, alternating between picking up the bowl before she eats and giving her permission to eat, until you can consistently place the bowl on the floor and she doesn’t move until you tell her she can. One of the great things about “food bowl waits” is that if you feed your dog twice a day, you already have two natural training sessions built into your schedule!
Wait at the Door
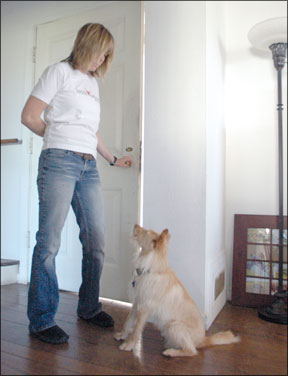
With your dog sitting at your side in front of a door, tell her to “wait.” (It works best if you use a door that opens away from you; if the door opens in, it’s much harder to use it to block the dog if she starts to go out, especially once you’re past the “open it a crack” stage.) Move your hand a few inches toward the doorknob. If your dog doesn’t move, click your clicker or use your verbal marker, and feed her a tasty treat. Repeat this step several times, moving your hand closer toward the doorknob in small increments, clicking and giving her a treat each time she stays sitting.
Remember that you’re shaping the behavior in tiny steps. If she gets up, say “Oops!” and have her sit, then try again. If she gets up two or three times in a row, you’re advancing too quickly; go back to moving your hand only a few inches toward the knob, and make your increments even smaller.
When she’ll stay sitting as you move your hand toward the door, try actually touching the knob. Click and give her a treat if she stays in place. Then jiggle the door knob. Click and reward her for not moving. Repeat several times, clicking and giving her a treat each time, before slowly opening the door a crack.
If your dog doesn’t move, click and treat. If she does get up, say “Oops!” and close the door. You’re teaching her that getting up makes the door close – if she wants the possible opportunity to go out, she needs to keep sitting.
Gradually open the door a bit more, an inch or two at a time. Any time she gets up, say “Oops!” and close the door, and try again. If you get two or three “oopses” in a row you’re doing too much; back up a few steps and progress more slowly. Click and reward her for not moving, several times at each step. When you can open the door all the way, take one step through it, stop, turn around and face your dog. Wait a few seconds, click, then return to your dog and give her a food reward.
When she’s really solid with you walking out the door, you can sometimes invite her to go out the door ahead of you, with you or after you – her “real life reward” – and sometimes walk through and close the door, leaving her inside as you would if you were leaving for work. Once the door has closed, she’s free to get up and move around.
One of the wonderful things about the “wait” cue is that dogs do seem to generalize it pretty easily. If you teach it at a door in your home, they’ll understand pretty quickly when you ask them to “Wait!” when you open the car door – a great safety behavior so your dog doesn’t jump out on the highway if you have to get out of the car on the side of the road to change a flat tire.
Once you’ve taught “wait” with the food bowl and door, try it on an on-leash walk. If your dog starts to move too far out in front of you, say “Wait!” If she doesn’t pause of her own accord, stop moving and the leash will stop her (don’t jerk her to a stop!). A few repetitions of this and she’ll figure it out in no time.
Teaching “Stay”
I really don’t use the formal stay very much. In fact, the only times I’ve asked any of my dogs to stay in the past two months were for a family dog-group photo and in a training class.
I teach “stay” as a much more precisely defined behavior than “wait.” It means, “Stay in the exact position I left you in, until I return to you and release you from the stay.”
There are three components to this behavior: duration, distraction, and distance. You will need to teach those three elements – the “three Ds” – separately.
1. Duration: Your dog will stay for however long you ask. Naturally, this is a shaped behavior – you’ll start with duration of a few seconds and gradually work your way up to longer and longer stays.
2. Distraction: Your dog will stay even if there are lots of fun and exciting things going on around her. Again, you shape this by starting with small distractions and moving up to bigger and better ones.
3. Distance: Your dog will stay even if you are very far away from her. It should be no surprise that you shape this one, too. Move away a very small distance and work up to longer distances.
Before you begin, decide what your “release” cue will be. This will be the word you use to tell your dog the stay is over and she must get up. A lot of trainers use the word “okay,” and like so many other things in dog training, there is disagreement over its use. Some argue that “okay” is used so much in conversation that your dog is likely to be released from a stay by accident. Other commonly used release words include “release,” “break,” “all done,” and “free” or “free dog.” I’ve used “okay” for more than 30 years and have yet to accidentally release my dog from a stay.
Duration of Time
Of necessity, you must start with the duration piece of the ” three Ds.” You can’t work on distance and distraction until your dog will stay for a reasonably extended period of time (30 to 60 seconds, minimum). Ask your dog to sit facing you. Wait a second or two, click, treat, and release. Be sure to deliver the treat directly to her mouth, at nose level, so she doesn’t jump up to get it before you release her!
If she gets up before you can click, say “Oops!” and whisk the treat behind your back and ask her to sit again. Repeat this step until she realizes that getting up makes the treat disappear. Ask her to sit again. If necessary, hold a treat at your chest, or even let her nibble on it right in front of her nose, to keep her sitting until you can click. When you know she’ll stay for at least two seconds, you can begin to say “Stay!” after you’ve asked her to sit, and before you click, treat, and release.
You can also use a hand prompt for the stay, if you wish, by holding out your hand with your palm toward your dog’s nose. If you do this, resist the temptation to hold your hand out for the entire stay – your dog will become dependent on your hand to maintain the stay behavior and it will be hard to “fade” it later.
Gradually shape for longer stays by extending the length of time you have her sit before you release her. As soon as you can, fade the use of the treat to keep her sitting. When she’ll stay for more than a few seconds, you can click and treat several times during the stay, so she understands that the click of the clicker doesn’t mean “release.” At first I repeat the stay cue after I click and treat, to help my dog succeed. Over time, I fade the use of the additional stay cues and the hand prompt.
I mentioned that the release cue means your dog must get up. This is the only way you know for sure she understands that she was released from the stay. If you use it to mean “You can get up if you want but you don’t have to,” you won’t know for sure if she heard or understood the release. If you make sure she gets up after the release, you’ll know she’s getting it.
Purposeful Training Distractions
I like to add distractions before I add distance, just in case distractions happen incidentally when I’ve moved away from my dog. To shape the distraction component, start small:
• Move one arm slightly. Click and treat.
• Move that arm a little more. Click and treat.
• Move both arms a little. Click and treat.
• Move both arms a little more. Click and treat.
• Hop once. Click and treat.
• Hop twice. Click and treat.
• Hop several times. Click and treat.
• Hop while moving your arms. Click and treat.
• Jog in place. Click and treat.
• Jog in place while moving your arms. Click and treat.
• Have a person walk by. Click and treat.
• Have a person walk by tossing a ball in the air. Click and treat.
• Have a person walk by bouncing a ball. Click and treat.
• Have a person jog by. Click and treat.
• Have a person walk by with another dog on leash. Click and treat.
The possibilities are endless!
Adding Distance to “Stay!”
Adding distance is the ultimate goal of training the stay behavior: to be able to walk away from your dog and leave her in a solid stay. We add distance last because the stay needs to be solid before you leave your dog, to maximize your likelihood of success. Again, add distance in small steps, to help your dog succeed.
I start with a half-step back, click, return to my starting position, and treat. Each time you leave your dog you’ll click when you’re away – sending your dog the message that she’s getting rewarded for staying when you’re a distance from her, but return all the way to her to deliver the treat, so you don’t inadvertently lure her out of position. One step at a time, move farther and farther away, move to the side, move behind her, until she’ll stay wherever you are. Then begin adding duration and distractions as well as distance, and you’re done! Almost.
The final step to a really solid stay is “stay with human out of sight.” The most common use of this behavior is for upper-level obedience competition – the Open Class in AKC obedience includes a three-minute out-of-sight sit-stay and a five-minute out-of-sight down-stay. Few owners expect their dogs to stay frozen in place in the real world while they go shopping, if for no other reason than the safety risk. Leaving a dog tied in public outside a store is risky, to say nothing of the huge risk of leaving them untethered and out of your sight.
To teach an out-of-sight stay, go back to shaping. Your dog is already solid on distance, distraction, and duration. As you practice your stays, occasionally step through the doorway and out of sight for a second, and return before your dog has time to realize you’re gone. Click, return, and treat. As you gradually increase the time you’re out of the room, you can set up a mirror at an angle that will let you observe the dog in your absence, so you don’t click while she’s making a mistake. Be careful – if your dog learns that she can watch you in the mirror, it will defeat the purpose of being out of sight.
Sit Means Stay?
Some trainers insist that a “Stay” cue is redundant. They teach their dogs that the sit cue means “Sit and stay sitting until I tell you to do something else.” If they tell a dog to “Down” it means “Lie down and stay down until I tell you to do something else.” Same with “Stand” or any other position cue.
One of the many things I love about positive training is that we now accept that there are many different (positive) ways to train. So yes, it is certainly possible to eliminate the “Stay” cue by teaching the dog that a position cue means to hold that position until I tell you to get up. I fully understand and respect the trainers who do it that way. More power to them – and I choose not to.
I like the wait and stay cues, and I also know that there are many time I ask my dogs to do something like “Go lie down” because I want them to go away from me and settle somewhere — and I know I won’t remember to tell them when it’s okay for them to move around again When I’ve asked for a stay I know I have to pay attention until I release them again, so I set us both up to succeed by teaching “stay” as a separate cue.
“Wait” is Most Useful
If I could only teach my dogs one of these behaviors, I’d choose “wait.” My assistant, Shirley, recently adopted a young Siberian Husky that she was fostering for the shelter in order to modify the pup’s resource-guarding behavior. Shirley brings Myah to work with her, and because people come and go all day, she has lots of opportunities to use the Wait cue, to remind Myah not to exit the office as people enter and leave. Shirley mentioned to me the other day that “Wait” was the most useful cue she’d taught her dog. I have to agree.
Pat Miller, CBCC-KA, CPDT-KA, is Whole Dog Journal’s Training Editor. Miller lives in Hagerstown, Maryland, site of her Peaceable Paws training center. Pat is also author of The Power of Positive Dog Training; Positive Perspectives: Love Your Dog, Train Your Dog; Positive Perspectives II: Know Your Dog, Train Your Dog; and Play with Your Dog.




I’m amazed, I must say. Seldom do I come across a blog
that’s both educative and engaging, and let me tell you, you have hit the nail on the
head. The issue is something not enough people are speaking intelligently about.
I’m very happy that I stumbled across this in my search for something concerning this.